Using Background Image/Videos
Overview
There are two types of background media available in kbp2video, media added via drag and drop/add files that persist through the entire track, or intro/outro that overlay the regular background. The video is assembled by layering the components in the following order:
Background color, image, or video
Intro
Intro fade-in
Intro fade-out
Outro
Outro fade-in
Outro fade-out
KBP Lyrics
This means that e.g. you can display text, such as titles, when the intro and outro are in progress, but it also means you may need to be careful and adjust your display/remove timings if you don’t want to display that text while the intro is fading from black, for example.
Background image/video
For information on loading in the background files, see Adding Files. This page will be more focused on specifications and what to expect in the output.
When choosing a background image or video, ensure its resolution is equal to your target Output Resolution. If it’s not, your output video will become your background’s resolution (at least until the Override Background feature is available).
When choosing a background video, also ensure the length is at least as long as your karaoke lyrics, and ideally as long as your audio track as well. If not as long as the lyrics, the karaoke will cut off early with the video. If not as long as the audio, it may mess up your outro if you have that set.
Intro/Outro
To add an intro and/or outro, select a track and click the Intro/Outro button.

The Set Intro/Outro UI will be displayed
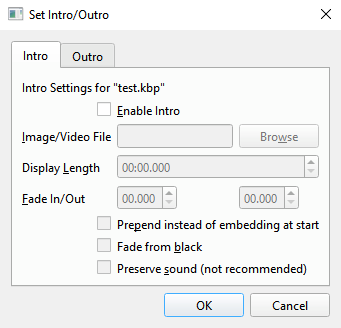
Enable Intro
This turns on the Intro feature for the file. If this is not checked, none of the other fields will be activated.
Image/Video File
Select a file to use for the intro. It can be any type of image or video file, but must be the same aspect ratio as the output video (or background media if you are using that).
Display Length
This is the amount of time to show the media at the beginning of the output video (including fade times). If you selected a video, this will pre-populate with the video length. You can specify a shorter time to truncate it if you want.
Prepend instead of embedding at start
If this is enabled, the intro will play entirely before the rest of the video (similar to the intro/outro feature in KBS). Note that any sounds in the video file will not be included.
If it is not enabled, the regular behavior is to start the intro at time 0 within the video, like embedding a CDG at the start of the display/remove timeline in KBS. This is the more flexible option, because it lets you display text from the KBS over the intro and have the audio start immediately if there is a long instrumental at the beginning.
Fade In/Out
This is the duration to apply a fade effect, in seconds.
Fade from black
If you check this option, your output video will start out black, then fade into the intro. If you leave it unchecked, it will start with your background image, video, or color and fade from that into the intro.
Preserve sound
This retains the audio if you use a video for the intro. If you use this without the prepend option, it will mix this audio with the main track. To maintain the volume level of the backing track, it will not use normalization, so be careful to avoid clipping. This option is not recommended, as many consider track start sounds to be annoying in karaoke tracks. There are a few commercial vendors that have distinctive ones that are particularly disliked, so please don’t be like them.
Outro
All the outro options look the same as intro, with three differences:
The image/video must be the same resolution as the output, not just aspect ratio.
The “Prepend instead of embedding at start” option becomes “Append instead of embedding at end”
The “Fade from black” option becomes a “Fade to Black”
Multiple projects
If you select multiple projects instead of just one before clicking the Intro/Outro button, it puts you in batch edit mode:
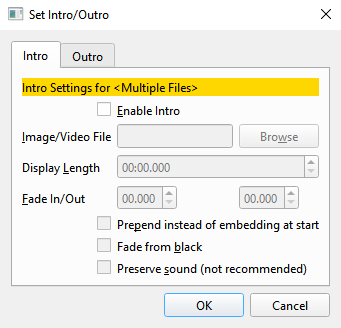
Any fields that vary between projects will be highlighted in gold. Modifying any field will change its contents for all selected files, but fields in gold that are left alone will remain unchanged. To confirm you got the right settings applied, you can spot check a few files individually by selecting them one at a time and opening the Set Intro/Outro window for them.
Accepting Changes
No changes to your intro/outro settings are applied until you hit the OK button. Hitting Cancel will roll them back.